
How to Link JavaScript to HTML: A Comprehensive Guide

This post was generated with AI and then edited by us.
JavaScript is the magic ingredient that transforms static web pages into dynamic, interactive experiences. But how do you actually connect this powerful scripting language to your HTML? This blog post will explore the various methods of linking JavaScript to HTML, from quick-and-dirty inline snippets to the best-practice approach of external files.
We’ll cover the pros and cons of each method, helping you choose the right one for your project and write cleaner, more maintainable code. Get ready to bridge the gap between structure and behavior, and bring your web pages to life!
Why Link JavaScript to HTML?
The simple reason for linking JavaScript to HTML is that HTML provides structure while JavaScript adds behaviours and functions to the structure.
Think of HTML as the skeleton of your webpage. It defines the content, layout, and basic elements like headings, paragraphs, and images while JavaScript is the muscle that brings your webpage to life. It enables interactivity, dynamic updates, and responses to user actions.
Without JavaScript, your webpage would be static and unresponsive. It’s like having a beautiful house with no electricity – it looks good, but you can’t really do anything inside!
Here are some key reasons why you need to link JavaScript to HTML:
- Create dynamic content: JavaScript allows you to change the content of your webpage on the fly, without requiring a page reload. This is essential for things like updating information, displaying user-specific data, or creating animations.
- Add interactivity: JavaScript enables you to make your webpage respond to user actions. This could be anything from clicking a button to submitting a form or hovering over an element.
- Validate user input: JavaScript can be used to check if users have entered valid information in forms, preventing errors and improving the user experience.
- Enhance user experience: JavaScript can be used to create a more engaging and user-friendly experience, with features like smooth scrolling, image galleries, and interactive maps.
In essence, linking JavaScript to HTML is what transforms a static webpage into a dynamic and interactive web application. It’s the key to creating modern, engaging, and user-friendly websites.
How to Link JavaScript to HTML?
JavaScript is essential for creating dynamic and interactive web experiences. But how do you effectively integrate this powerful scripting language with your HTML?
There are 3 methods –
- Inline JavaScript – Embedding code directly within HTML attributes.
- Internal JavaScript – Encapsulating it within
<script>tags. - External JavaScript – Linking external
.jsfiles.
We’ll examine the benefits and drawbacks of each approach, providing you with the knowledge to make informed decisions about how to structure your web projects.
1. Inline JavaScript (Not recommended)
This approach involves directly embedding JavaScript code within HTML attributes, typically event handlers like onclick, onload, onmouseover, etc.
<button onclick="alert('Hello!');">Click Me</button>Advantages of Inline JavaScript
- Simplicity for very basic interactions: For extremely simple, one-off scripts (like a single, very basic alert), inline JavaScript can be quick to implement. Think of a tiny, self-contained interaction.
- No separate file: For the absolute simplest cases, it avoids the need to create and manage an external
.jsfile.
Disadvantages of Inline JavaScript
- Code Clutter: Mixing JavaScript directly into HTML makes the code harder to read, understand, and maintain. It breaks the separation of concerns.
- Maintainability Nightmare: Updating or changing JavaScript code becomes incredibly cumbersome when it’s scattered throughout the HTML. Finding and modifying the relevant snippets is time-consuming and error-prone.
- Reduced Reusability: JavaScript code embedded inline is tied to that specific HTML element. You cannot easily reuse the same code elsewhere on your site.
- Difficult Debugging: Debugging inline JavaScript can be challenging due to its scattered nature. It’s harder to isolate and fix errors.
- Performance Issues (Minor): Although the performance difference is usually negligible, inline JavaScript can slightly increase the size of the HTML file, and thus the download time. This is less of a concern than the maintainability issues.
- Security Concerns (Minor): In some very specific situations, inline event handlers could potentially make a site slightly more vulnerable to certain types of attacks (like Cross-Site Scripting – XSS). This is less of a concern than the other disadvantages.
When to use Inline JavaScript?
Inline JavaScript should be used very sparingly. Its use cases are extremely limited, and it’s generally best avoided. However, there are a few niche situations where it might be considered:
- Extremely Simple, One-Off Interactions: If you have a truly tiny and isolated piece of JavaScript, like a single, simple alert or a very basic style change on a single element, inline JavaScript might be acceptable.
- Rapid Prototyping (With Caution): During the very initial stages of prototyping, when you’re just experimenting with ideas and don’t want to worry about file organization, inline JavaScript can be slightly faster to throw together.
2. Internal JavaScript
This method involves placing your JavaScript code within <script> tags inside the <head> or <body> of your HTML document.
<!DOCTYPE html>
<html>
  <head>
    <title>My Web Page</title>
    <script>
      function myFunction() {
        alert("Hello from internal script!");
      }
    </script>
  </head>
  <body>
    <button onclick="myFunction()">Click Me</button>
  </body>
</html>
Advantages of Internal JavaScript
- Better Organization than Inline: Compared to inline JavaScript, internal JavaScript provides a slightly better structure. The JavaScript code is contained within
<script>tags, separating it somewhat from the HTML structure. - No Separate File (Sometimes): For very small, page-specific scripts, it avoids the overhead of creating and managing an external
.jsfile. This can be convenient for one-off scripts that are only used on a single page. - Access to DOM Directly: Scripts placed within the
<head>(though generally less recommended now) can sometimes be useful for setting up things before the HTML is fully parsed. However, placing scripts right before the closing</body>tag is usually the better approach even when using internal scripts.
Disadvantages of Internal JavaScript
- HTML File Bloat: Embedding a significant amount of JavaScript code directly into the HTML file can make it large and harder to navigate, especially as the project grows.
- Limited Reusability: While functions can be defined and called within the same HTML file, it’s not straightforward to reuse that JavaScript code across multiple pages. You’d have to copy and paste the code, which leads to redundancy and maintenance issues.
- Maintainability Challenges: While better than inline, managing a large amount of JavaScript within the HTML file can still become challenging. Finding and updating specific parts of the code can be difficult.
- Potential for Blocking Rendering (if in
<head>): If the<script>tags are placed in the<head>(older practice), the browser might pause parsing the HTML while it downloads and executes the JavaScript. This can delay the rendering of the page content. This is less of a concern if the script is placed before the closing</body>tag. - Still Not Ideal for Large Projects: Internal JavaScript is generally not suitable for large or complex projects. The limitations in terms of organization, reusability, and maintainability become more pronounced as the codebase grows.
When to use Internal JavaScript?
Internal JavaScript, where your JavaScript code resides within <script> tags inside your HTML document, has a few limited use cases:
- Small, Page-Specific Scripts: If you have a very small amount of JavaScript code that is only used on a single page and is unlikely to be reused elsewhere, internal JavaScript might be acceptable. Think of a few lines of code to handle a very specific interaction on that page.
- Rapid Prototyping (Early Stages): In the very initial stages of prototyping, when you’re quickly testing ideas and haven’t yet established a full project structure, internal JavaScript can be slightly faster for experimenting. However, it’s essential to refactor this code into external files as soon as your prototype starts to solidify. Don’t let internal JavaScript become a permanent fixture.
- Scripts Dependent on Specific HTML Structure: If your JavaScript code is very tightly coupled to the specific structure of a single HTML page (and you know it won’t be reused), internal JavaScript can sometimes be slightly more convenient. However, even in these cases, consider if external files might be more appropriate if the script grows.
3. External JavaScript (Recommended)
This is the recommended approach for almost all projects. You create a separate .js file containing your JavaScript code and then link it to your HTML using the <script> tag with the src attribute.
Step 1: Create a JavaScript file (e.g., script.js)
function myFunction() {
    alert("Hello from external script!");
}

// More complex JavaScript code can go here...
console.log("This is a message from the external script.");
Step 2: Link the JavaScript file in your HTML
<!DOCTYPE html>
<html>
  <head>
    <title>My Web Page</title>
  </head>
  <body>
    <button onclick="myFunction()">Click Me</button>

    <script src="script.js"></script>
  </body>
</html>
Want to see an example?
Here is an example of the completed step in VS Code.
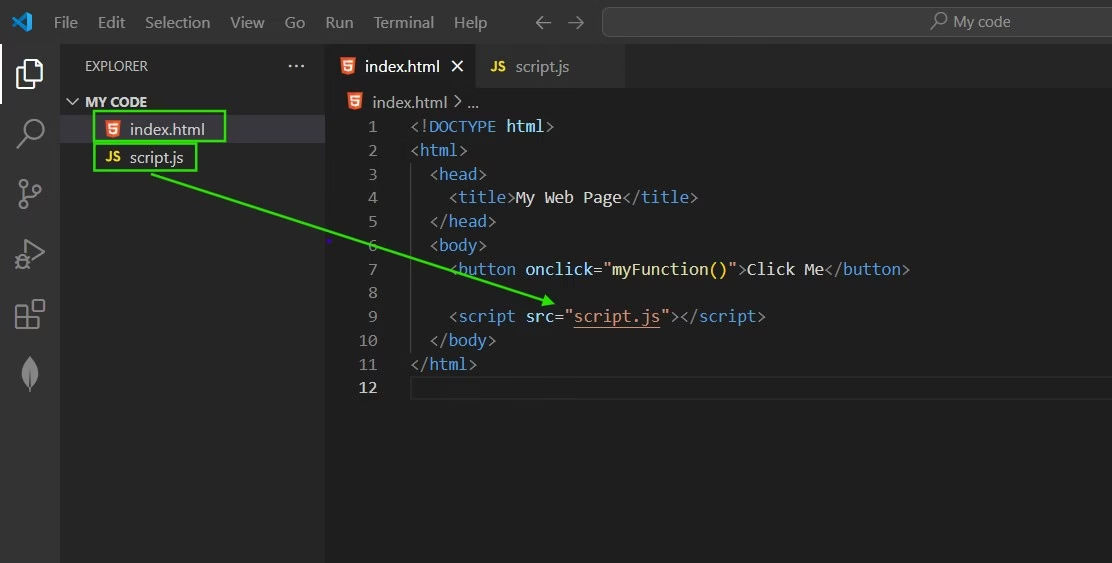
Explanation:
Here we have created 2 files in VS Code. The first one is index.html and the second one is script.js. Index.html contains HTML code and script.js contains JavaScript code.
To connect the JavaScript file with the HTML document we have used <script> inside html body. It looks like this – <script src="script.js"></script>.
Advantages of External JavaScript
- Clean Separation of Concerns: Keeps your HTML (structure) and JavaScript (behaviour) completely separate. This makes your code much more organized, readable, and easier to understand.
- Improved Maintainability: When your JavaScript is in a separate file, it’s much easier to find, update, and debug. You don’t have to wade through HTML to make changes to your JavaScript logic.
- Code Reusability: The same
.jsfile can be linked to multiple HTML pages. This promotes code reuse, reduces redundancy, and makes your development process more efficient. - Browser Caching: Browsers can cache external JavaScript files. This means that when a user visits another page on your site, their browser can use the cached version of the JavaScript, leading to faster page load times.
- Better Collaboration: Separating HTML and JavaScript makes it easier for developers to work on different parts of the project simultaneously without interfering with each other’s code.
- Minification and Optimization: External JavaScript files can be easily minified (removing unnecessary characters) and optimized to reduce file size and improve performance.
Disadvantages of External JavaScript
- Initial HTTP Request: The browser needs to make an additional HTTP request to download the external JavaScript file. However, this is usually offset by the benefits of caching for subsequent page loads.
- Potential Loading Delay: If the external JavaScript file is large or the user’s connection is slow, it could potentially delay the execution of the script. This can be mitigated by placing the
<script>tag before the closing</body>tag or usingdeferorasyncattributes. - Slightly More Setup: It requires creating and managing an additional file. However, this is a very small price to pay for the significant benefits.
When to use External JavaScript?
You should use external JavaScript files in almost every web development project that involves any significant amount of JavaScript. It’s the best practice for organizing and managing your code. Here’s a breakdown of when it’s most appropriate:
- Any project with more than a few lines of JavaScript: If your JavaScript code goes beyond a couple of simple lines, it belongs in an external file. This keeps your HTML clean and readable.
- When you need to reuse JavaScript code: If you have JavaScript functionality that you want to use on multiple pages of your website, an external file is essential. You can link the same
.jsfile to all the pages that need it, avoiding code duplication. - For complex interactions and logic: Any JavaScript that involves DOM manipulation, event handling, AJAX calls, animations, or any kind of logic beyond basic actions should be in an external file.
- Large projects: External JavaScript is absolutely crucial for large projects. It allows teams of developers to work on different parts of the project without stepping on each other’s toes.
- When performance matters: While there’s a small initial overhead for the browser to download an external file, the benefits of caching far outweigh this. Once the file is downloaded, it’s stored in the user’s browser, and subsequent page loads will be much faster.
- Always, unless you have a very good reason not to: Seriously, external JavaScript is the standard practice for a reason. It’s the most organized, maintainable, and efficient way to work with JavaScript.
In short: Unless you’re dealing with an extremely simple, one-off interaction where the JavaScript code is truly tiny and isolated, you should be using external JavaScript files. It’s the best way to ensure your code is clean, reusable, and easy to maintain.
How does the placement of your <script> tag affect your code?
The <script> is an element used to embed JavaScript into HTML documents. The placement of your <script> tag significantly impacts how your HTML and JavaScript interact, affecting both performance and functionality.
Placing <script> tags in the <head> (Older Practice)
- How it works: Traditionally,
<script>tags were often placed within the<head>section of the HTML document. - What happens: The browser begins parsing the HTML. When it encounters a
<script>tag in the<head>, it immediately stops parsing the HTML, downloads the JavaScript file (if it’s an external script), and executes the JavaScript code. Only after the JavaScript has finished executing does the browser resume parsing the rest of the HTML. - Problems: This can lead to a poor user experience. The page content might not be visible to the user until the JavaScript has downloaded and executed, leading to a perceived slow load time and a blank or incomplete page while the user waits. If the JavaScript tries to manipulate elements that haven’t been parsed yet (because they come later in the HTML), it can lead to errors.
Placing <script> tags just before the closing </body> tag (Best Practice)
For most cases, placing <script> tags just before the closing </body> tag is the recommended approach.
- How it works: The
<script>tag is placed just before the closing</body>tag. - What happens: The browser parses the entire HTML document and builds the DOM (Document Object Model) before it encounters the
<script>tag. Then, it downloads and executes the JavaScript. - Advantages:
- Improved Perceived Performance: The user sees the page content much faster because the HTML is parsed and rendered first. The JavaScript downloads in the background.
- DOM Availability: The JavaScript code is guaranteed to run after the HTML has been fully parsed. This means the DOM is ready, and your JavaScript can safely manipulate HTML elements without encountering errors.
- Why this is better: This approach significantly improves the user experience. The user can start interacting with the page content sooner, even if the JavaScript hasn’t fully loaded yet.
Using defer and async attributes (For <script> tags in <head> or <body>)
These attributes provide more control over script loading and execution, especially when placed in the <head>.
Use defer when the script needs the DOM to be fully parsed and the order of execution matters. Use async for independent scripts that don’t rely on the DOM and where order of execution doesn’t matter. This is good for things like analytics scripts.
defer: The script is downloaded in the background without blocking HTML parsing. However, the script’s execution is deferred until after the HTML parsing is complete. Scripts withdeferwill execute in the order they appear in the HTML. Usedeferwhen your script needs to interact with the DOM.async: The script is downloaded in the background without blocking HTML parsing. However, the script executes as soon as it’s downloaded, without waiting for the HTML parsing to complete. Scripts withasyncmay not execute in the order they appear in the HTML. Useasyncfor independent scripts that don’t rely on the DOM or other scripts.
Conclusion
Mastering the various ways to link JavaScript to HTML is essential for any web developer.
Choosing the Right Method:
- Inline JavaScript: Only for very simple, one-off interactions where the JavaScript code is extremely short. Avoid for anything more complex.
- Internal JavaScript: Suitable for small projects or when you need to include a small amount of JavaScript that is specific to a single page.
- External JavaScript: The best practice for almost all projects, especially larger ones. Promotes code reusability, organization, and maintainability.
While inline JavaScript has its limited uses, internal and external JavaScript is the preferred method for building robust, scalable, and maintainable web applications. You can also read the comparison between internal and external javascript before deciding which to use.
By understanding the best practices and utilizing the defer and async attributes, you can optimize your web pages for performance and create engaging user experiences.
Get up to 85% off
Build your project using Managed VPS & Dedicated hosting and decrease your workload.
You'll get seamless migration, exceptional savings, 24/7 technical support, HIPAA compliant, PCI compliant, Multi-Level DDoS protection, 30-day money-back guarantee and more with Liquid Web.
Affiliate Disclosure: Affiliate links are available here. If you click through the affiliate links and buy something, we may get a small commission, and you'll not be charged extra.